Powered by Blogger.

Sunday, June 30, 2013

Pickled Asparagus

I love pickled asparagus but it is a very expensive relish if I have to buy it from a grocery store.  So, I decided to pickle my own.  It was little scary at first, but with a copy of The Fresh Girl's Guide to Easy Canning and Preserving by Ana Micka and a little creativity (I added some hot peppers to make them a little spicy), I made my own pickled asparagus.  Here's how I did it.

I purchased fresh asparagus, dill, onions, cayenne peppers and jalapeño peppers at the Minneapolis Farmers' Market.  (I got the garlic at my local grocery store.)
I sanitized all of my lids and jar by placing them in water on the stove and bringing them to a simmer.  I removed them with kitchen tongs and placed them on a clean white towel to dry.  Keeping things sterile is must in canning!!!!

I cut my asparagus spears so they'd fit in my jars.
To the jars of asparagus, I added two garlic cloves,
a few onion slices,
some cayenne pepper slices,
some jalapeño slices,
lots of fresh dill,
and 1/2 teaspoon of pickling spice.
Here's what it looks like before the brine is added.
To make the brine, in a large pot I combined 6 cups of water,

two cups of white vinegar,
1/4 cup of sugar,
and 1/3 cup of pickling salt.
I put the pot on the stove......
and simmered the brine until the salt and sugar dissolved.
Using a funnel, I added the brine to the jars of asparagus,
leaving about 1/4 of an inch of headroom.
Next I prepared the canning pot by filling it 2/3 full of water.
To the water in the canning pot, I added 1 Tablespoon of water to keep the hard water from making spots on my jars.
After tightly covering the jars, I added them to the simmering canning pot.

Simmer for about 10 minutes and then remove from the hot water bath.
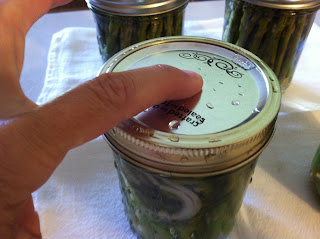
I tested the seal after taking them out of the water by gentle touching the top of the lid.  Yay!!!  All four jars sealed.  (If one or more hadn't sealed, I would have had to put those jars in the refrigerator and eat them within 2 weeks.)

Here's the finished product.  I have to wait at least 24 hours before taste testing them.  I'm hoping that by adding fresh cayenne peppers and jalapeno peppers that they will be spicy.  These asparagus spears are good alone as a relish or added to a salad.  They also make a great relish to a Bloody Mary.  (This recipe made 4 large mouth pint jars with a little brine left over.)
My next canning project is going to be pickled beets.  I'm hoping to do this together with my mom, to guarantee that they turn out.  Of course, I will blog about it!

"Asparagus inspires gentle thoughts."  -Charles Lamb

Saturday, June 29, 2013

Rhubarb/Raspberry Jam

I got up early this morning to go to the Minneapolis Farmers' Market.  I really wanted to make jam and pickled asparagus and I wanted the freshest ingredients I could get.  There's no place better for fresh and local produce than the Farmers' Market.

After bringing all my goodies home, I set to work making Rhubarb/Raspberry Jam.  This is an extremely simple recipe without having to worry about creating a seal on your jam jars.  It also only requires a few ingredients:  rhubarb,
raspberry pie filling,
a large package of raspberry jello, and white sugar.
Cut 7 cups of rhubarb and put in a large pot.
To the rhubarb, add the raspberry pie filling.
Next, add 4 cups of sugar.
Stir to incorporate all of the ingredients.
Bring this mixture to a boil and keep at a boil for 10 minutes.  The sugar will dissolve and the rhubarb will become soft.
After 10 minutes of boiling, remove from heat and add the raspberry jello.
Stir well!
Have sterilized lids and jars ready.
Fill each jar with the jam.  I leave about 1/4 inch at the top of each jar.
This recipe fills approximately 8 jam jars.
Cover tightly and either refrigerate or freeze.  This jam can be used right away.  I always keep one jar in the refrigerator and replenish it from my "stash" in the freezer.  It makes a great hostess gift with a simple ribbon and jam spoon tied around the top.  It's also a great alternative to peanut butter and grape jelly sandwiches and it's delicious drizzled over ice cream.  Enjoy!!

"Jam!  I love my jam.  I've just had a batch of it come through, I've been making it."  Kate Moss

Friday, June 28, 2013

Canning "How To" Book by a Minnesota Author

Tomorrow if you're up early, you will catch me at the Minneapolis Farmers' Market.  I'm hoping to do a little canning tomorrow and want to get the freshest produce possible.  I received a great canning book from a friend last year and in the last few days, I've read it from front to back and in between to get some great tips.  The book is called The Fresh Girl's Guide to Easy Canning and Preserving by Ana Micka.
It even comes with DVD for those visual learners like me!
The book is sectioned by hot water bath method
and pressure cooker method.
Each method has a variety of recipes with very easy to follow steps by step instructions.  The book also has a safety section
That goes over things like:  proper sterilizing techniques, which canning method is appropriate for which food based on their pH value, correct temperature for food preservation, tips to make sure your jars seal, and how to properly store your canned foods.

There are also tips on growing a canning garden
a special recipe section with canning recipes from around the world.
It will be this book along with a couple of other canning recipes
that will keep me happily busy in my kitchen tomorrow!  You can bet I'll blog about it tomorrow!

"Home canning is a sure way to avoid corn syrup, industrial oils, additives, and high levels of sodium." -Ana Micka

Thursday, June 27, 2013

Invites Designed and Made by the Birthday Girl

Tonight my son had a late night baseball game.  My daughter prefers not to go to his games and tonight she wanted to stay home to work on a craft project.  She wanted to make her birthday invitations.  We have already asked, and somewhat made arrangements with two of friends for her birthday party but she insisted that they be sent invites.  I think she may come by this naturally!

This is what my kitchen counter looked like when I got home.
In carpentry, this would be called "measure twice, cut once".  In the crafting world, this is called "making a pattern".  She has even put arrows with directions:  "move everything up".

 Here are the finished products that I will be dropping in the mail in the morning.

They were folded and placed in unsealed envelopes.  She wanted me to proof them before we sealed the envelopes.
I could've bought invitations or given her instructions on exactly what to do but I love that she likes to create things with her own style.  After all, this is the sign she made and has hanging above her art table.
Give children supplies to create and tell them it's OK to color outside the lines!

"Every child is an artist.  The problem is how to remain an artist when we grow up."  -Pablo Picasso